Category: Chapter 4 – Be Found on YouTube

Create a YouTube Channel From Google Plus

Create a YouTube Channel From Google Plus

Once you have your Google My Business Page set up, it’s easy to create a YouTube channel from the Page Interface.

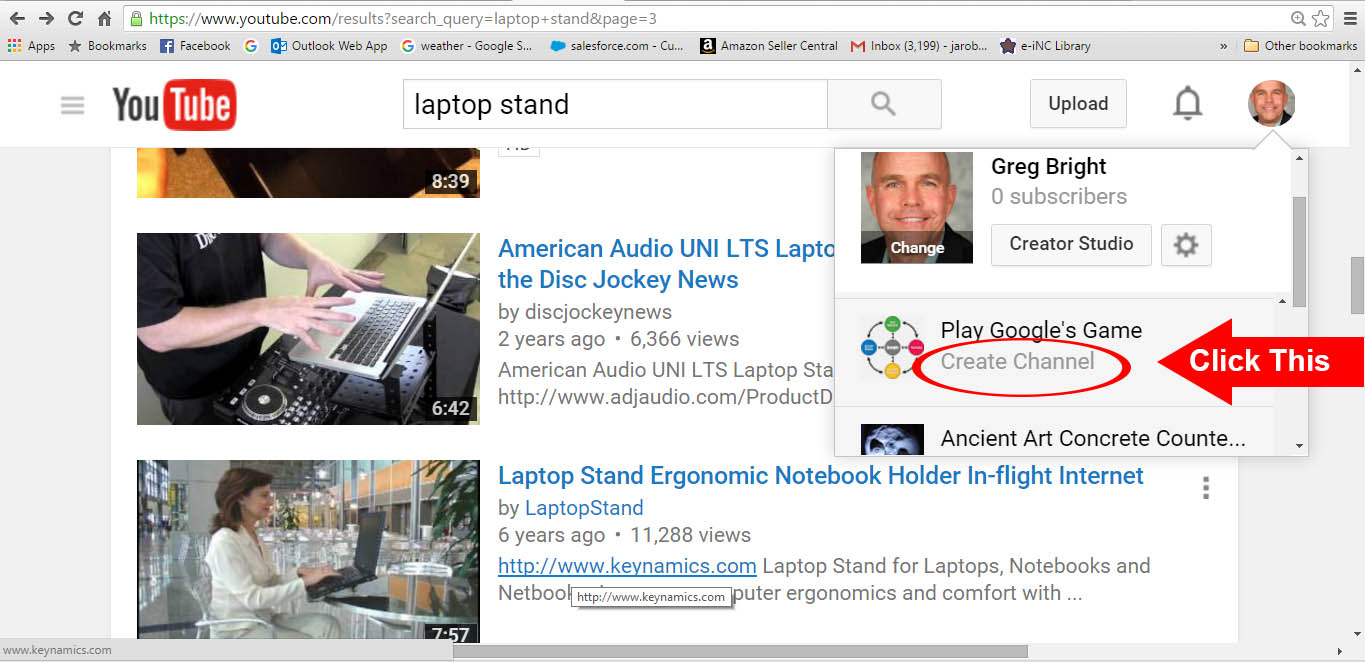
Just go to www.YouTube.com and click on your profile picture on the top right hand side. This will make a drop down menu appear. Once the list of your Google+ Business Pages appear in that drop down menu (you will probably only have one) , then click “Create Channel”

create youtube channel from google plus


Click OK at the Next Screen 

Youtube Channel Video Manager

Editing on Your YouTube Video Manager Page

There are many editing options available after you have published your video. One thing to note is that there is no way to replace an old video with a different version (even if it’s just a slight revision of the same video) and keep the original view count, comments or ratings. Instead, you may want to try using clickable annotations or link to the new version of the video from your old video.

Go to your channel’s Video Manager

You will see a list of your uploaded videos. Find the video you want to edit, then click the little Edit icon in the middle of the video.

On the Info and Settings page, you’ll see three tabs, depending on your account type:

Basic info: Change video title, description, tags, category, privacy. Note: You can use most characters to fill in the information in the video fields (like title or description), except angle brackets.
Monetization: See the options for monetizing your video. Learn more about monetizing your content.
Advanced settings: Change comments permissions, license, caption, video location, recording date, and 3D video options.

Caution: Be careful; changing a title that is already optimized and ranking well for your keywords is a big mistake!

Tip: Download the YouTube Creator Studio app for iOS or android. The app allows you to manage your YouTube Channel from your mobile device.
Enhancement Options and Features Available after Publishing

You can also make some changes to a video that you’ve already uploaded by using YouTube Video Enhancements. The Enhancement option is constantly adding features, so check it often for updates and ways you can tweak your video that has already been published.

Currently, in order to be eligible for YouTube Video Enhancements, your video must not have received more than 1,000 views; other restrictions apply.

Using enhancements, you can make some of the following improvements and edits to your videos. Note that on videos you have already published, you can’t use Cut/Snip at this time to remove middle segments. This feature is only available before you publish the video. You can only use Trim to remove frames at the beginning or the end.

Auto-fix: Performs a one click-fix to enhance the video’s lighting and color. You can also make manual adjustments to Fill Light, Contrast, Saturation, and Color Temperature by using the sliders
Lighting: Fill Light – Contrast – Saturation – Color Temperature
Stabilize: Adjusts the video to correct any shakiness
Slow Motion: Slow the speed at which your video plays (half speed, quarter speed, eighth speed)
Trim: Clip parts (frames) off the beginning and/or end of your video
Filters: This tab shows pre-set color filters that you can apply to your video to give them a stylish and unique look
Face blurring: Protect the anonymity of people in your video. Click on Special Effects to access this feature

YouTube Video Editor

YouTube’s Built in Video Editor

So you don’t have video editing software? No problem; YouTube has a video editor that you can use as you upload the video. This video editor keeps growing in functionality over the years and works very well now.

Access the YouTube Video Editor here  – You’ll need a YouTube account

SEO Juice Alert: Google can more easily recognize edits in their own video editor, versus using a third party. This is especially important when it comes to overlaying text onto your video. Be sure and use your keywords!

This YouTube Video Editor is a great example, because it’s basically a simplified version of more advanced video editors like Adobe Premier Elements.
• Sign in to your YouTube (Gmail) account
• Click the Upload button at the top of the page
• Click Edit on the right of the upload page, under “Video Editor”

With the YouTube Video Editor, you can do all of the things we recommend for editing:

• Combine multiple videos and still images you’ve uploaded to create a new video
• Trim, remove unwanted segments, and slice up your clips to custom lengths
• Add music to your video from a library of approved tracks
• Customize clips with special tools and effects

Using these tools, you can put together clips to create new videos and publish them to YouTube with one click.

All of your previous video uploads are added automatically to the Video Editor and can be transitioned in as a clip on your new video. From your upload list you can drag the clip/image to the bottom of the timeline at the bottom of the editor, where it says, “Drag videos here to begin editing” when you start a new project.

Lengthen or Shorten:

Trim: Cut the length of your clip by moving your cursor over the edges of your video in the timeline. Drag the handles toward the center of the video to shorten. This shortens the length from either the beginning or the end, not the middle. See Cut/Snip below for removing segments from the middle of your clip.

Lengthen: Drag the handles outward from the center of the video to lengthen. Lengthening past the original length of the video will result in the video repeating.

Cut/Snip: Clips can be cut into portions. Move your mouse over the video and click the scissors icon to bring up the snip marker. Move this to where you want to snip the clip, then click on the scissors button to snip the clip.

Customize and Add Effects

Rotate: Rotates your video 90 degrees.

Effects: Apply Video Enhancements to your video to color correct, stabilize, and add filters.

Text: Apply a text overlay on the clip – Use Your Keywords – and Add Your Phone Number and Website Address!

Slow Motion: Modify the speed at which the clip plays. Move your mouse over a clip to bring up any of these options.

Add Music: You can add a new audio track to your video. Click the music note button in the upper left of the editor to bring up YouTube’s library of pre-approved songs. The audio from an added track will overlap or replace your clips’ original audio by default.

Customize the Thumbnail: You can do this either during the upload or after the video is published.

YouTube Guidelines

YouTube Guidelines – For Getting Reviews

It’s perfectly OK  and Google encourages us to ask For Reviews on our YouTube videos

From Google: “Businesses can strengthen their relationship with customers by directly engaging with reviewers on Google. To encourage reviews for your business simply remind your customers to leave feedback on Google. Reminding customers that it’s quick and easy to leave feedback on Google on mobile or desktop can help your business stand out from sites with fewer reviews.”

Conflict of interest: Reviews are most valuable when they are honest and unbiased. Google does not want you to review your own business, or if you’re an employee don’t review your employer. Don’t offer or accept money, products, or services to write reviews for a business and don’t write negative reviews about a competitor. Don’t set up review stations or kiosks at your place of business just to ask for reviews written at your place of business.

See the review guidelines

See YouTube’s Overall Guidelines


Youtube Video Lighting

How To Use Proper Lighting for YouTube Videos

As with still photography, lighting is going to be your biggest challenge. Poor lighting can make an expensive video camera look bad, and great lighting can make a cheap video camera look fantastic. It’s all about the lighting and you have to think ahead and plan for it: the time of day, the weather, etc.

Learn More with this YouTube Lighting Lesson

Learn more tips about lighting From YouTube

The goal of lighting is to create flat, diffused light and eliminate shadows. We’re trying to mimic an overcast day, which are the best circumstances to shoot video or still photography. To do this indoors, use two lights, pointing towards the subject from a height just above the person’s eye line. A good rule of thumb is to place the lights about three feet away from the subject. The lights should be located on either side of the camera, right in front of the lens.

Soften the light with diffusion material in front of the light source, or bouncing the light off another surface suitable for diffusing and reflecting it back on the subject.

Tip: A technique photographers use is to bounce the light off a wall or ceiling. Conditions have to be right, but this works more often than not.

Keep the subject off the background (wall) at least four feet to create separation between the subject and the background and eliminate shadows. A good trick is to bring in a third light and place it right behind the subject, low and pointing up to the back wall.

Embed YouTube Videos on Your Website

Embed YouTube Videos on Your Website

You must complete the circle and embed YouTube videos on your website. Embedding is imperitive for both high YouTube ranking and regular Google search ranking.

YouTube allows you to embed their videos into your website by providing you with the embed code. This is great because the embed code puts a little video player right on your website. Visitors love it; they can just click and watch, and never leave your website. These can be instructional videos from your YouTube channel or anyone else’s YouTube video, as long as they have opted to allow embedding (most do). Of course it’s best to create your own YouTube videos, as explained in Chapter 4, but any YouTube video which is relevant to your keywords will do. You can see an example of the embed code from the YouTube screenshot below. It’s the HTML code underneath the word “Embed”. Just copy and paste it into your blog post as shown in the next screen shot.
Be sure and place some text in close proximity around the video in the blog post. Relate it back to your product or service, and of course work in a few of your important keywords. It would be very helpful if the video title had those same keywords.

Learn more form YouTube here

Youtube Live Streaming

Introduction to YouTube live streaming

Let’s keep an eye on YouTube’s Live Streaming and other live video streaming platforms that companies are just launching. Live Video Streaming apps – YouNow – GoPro (Meerkat) – Twitter (Periscope)

For YouTube Live Streaming, you need to enable Live for your channel.

Confirm that your channel is verified and in good standing.

Then, enable live streaming from Creator Studio tools –> Live Streaming.

Once enabled, you have two options to start live streaming on YouTube:

  1. YouTube an easy, instant way to start streaming now. Start sending content – They’ll automatically start and stop the stream for you.
  2. You can also schedule a live event. Preview before going live, change privacy settings, setup a backup for redundancy and manually start & stop.

Learn how here


Uploading to YouTube

Uploading Your Video File to YouTube

YouTube supports just about any popular video recording file format and uploading is simple. First you have to save your video file into a folder on your computer. We find the process of uploading much easier on a PC or Mac, but it’s also becoming easier and more intuitive with new mobile devices every day.

Log into your Google account, preferably on Google Chrome (if you are not already logged on). Click the YouTube icon near the top right part of the webpage, under “Apps”. Once YouTube.com is loaded, you will see a big icon button at the top right that says “Upload”.

You can upload videos to YouTube in a few easy steps. Click here to find the easy instructions to upload your videos from a computer or from a mobile device.

Learn More: For the latest tips on uploading from various devices

  • Upload videos
  • Upload videos longer than 15 minutes
  • Set default upload settings
  • Upload audio or image files
  • Use webcam to record video
  • Formatting tags
  • Upload a video on Xbox One
  • Import videos from Google Photos
  • Upload 360 degree videos
  • Supported YouTube file formats
  • Virtual reality videos
  • Fix upload problems
  • Supported YouTube file formats
  • Common uploading errors
  • Troubleshoot audio or video issues
  • Rejected (duplicate upload) message
  • Video stuck in processing
  • Video stuck on “Sending to subscribers’ feeds”
  • Video stuck during upload
  • Rejected (TOS violation) message
  • YouTube Capture
  • Get started with YouTube Capture
  • Record videos with YouTube Capture
  • Settings on YouTube Capture
  • Can’t sign in to channel in YouTube Capture
  • Edit videos and add soundtracks
  • Upload and share videos on Capture
  • Manage and delete videos with Capture
  • Troubleshoot Capture issues

YouTube Academy

Learn From YouTube Creator Academy

Uploading & Optimizing Your Videos for YouTube & Google Search

Optimizing our videos for YouTube uses the same concept as optimizing our website for the search engines and most of it is done during the uploading process. We’re simply optimizing the video for our keywords that our customers are searching for on YouTube (and Google). Like regular search engine optimization, the goal is to get our videos to show up high in the YouTube search results— preferably in the top 10. This only takes a few seconds and it is done using the various metadata areas, which YouTube provides at the YouTube upload dashboard.

Define: Metadata – In this case YouTube refers to Metadata as any and all additional information provided on a video. This includes the title, description, tags, clickable annotations, and thumbnail image.

YouTube uses ranking factors to determine which videos get shown at the top of each search results page (SERP). Google is looking at signals from things like your video’s click through rate, number of views, the amount of time viewers spend watching it, the ratings, comments, sharing, and last but not least, the backlinks directly to the YouTube video URL. They’re looking at the interactions of real people sharing and discussing your content.

Learn More: Learn how to “get discovered” by optimizing your YouTube videos on YouTube’s Creator Academy.

More YouTube resource links below.

YouTube Creator Academy Search Help

YouTube Creator Academy’s own YouTube Channel

Get Help from YouTube

Another Help Area for YouTube can be found here


YouTube Quality Guidelines

YouTube Quality Guidelines

YouTube uses ranking factors to determine which videos get shown at the top of each search results page (SERP). Google is looking at signals from things like your video’s click through rate, number of views, the amount of time viewers spend watching it, the ratings, comments, sharing, and last but not least, the backlinks directly to the YouTube video URL. They’re looking at the interactions of real people sharing and discussing your content.

YouTube is also going to look at the total number of channel subscribers, how many times your video appears in a user’s playlist, how often a viewer favorites it, and how many times it’s been embedded on a website; see “embed code” a few chapters down.

Black Hat Warning: Please don’t try and game the system; YouTube will catch you. Google says, “Please do not use these features to game or trick our search algorithms. All metadata should be representative of the content contained in your video. Among other things, metadata added in an attempt to game search algorithms will lead to the removal of your video and a strike against your account.”

Click Here for YouTube’s Quality Guidelines