Author: gregbright

SEO Screen Reader

Screen Reader Test for SEO

We know that Google likes websites that are friendly to disabled persons and allow accessibility for all. Proof of this can be found in how they treat the ALT tag on images. We think it’s pretty cool too, and as website designers we have an obligation to allow access for all.

In chapter 3 we learned that Googles uses the words you put in the ALT tag to rank your images on Google Image Search. ALT tags are how screen readers play the description of an image through the speakers of a visually impaired user. They simply speak the words you put in the ALT tag.

We would like to take this concept a step further with our SEO Screen Reader Project. Let’s use a screen reader to test our website for SEO. If the screen reader can pick up and play our keywords through a speaker then Google can easily find them too. Keep an eye on this project as we develop it.

WordPress Image File Folder Image Search

Store Images in a Folder (Directory) Named Images

We think it makes it easier on the Google Spiders to find all of your images if they are stored in a folder (directory) called “images”. Note that a directory is just a fancy name for a folder on the server that hosts your website program and files.

For Example: www.PlayGooglesGame.com/images

If you use WordPress, Google has also indicated that another good practice is to create a standalone landing page just for your images, with the ability to allow visitor comments.

We think you should do both.

If you are using WordPress, see the screenshot below from FileZilla for creating a special “images” file folder on your server that you can store your images in.

Email Purchase Scam

Beware of Scam Emails to Purchase Product

We get these type of scam emails daily. They are almost always from a non-domain specific email address, like Gmail, Aol, Yahoo, etc.

Because you’ve read our book and you are now very good with optimizing your keywords – These emails are usually inquiring about a a generic product they find on your website through a keyword search, and then it almost always ends with … “Please let us know the cost and please let us know what forms of payment you accept.” All of which is on our website!

Once you start corresponding with them, there are 101 ways ways they can scam you , all the way from sending you a check, then canceling it 30 days later, long after shipment has occurred. DO NOT EVEN RESPOND!

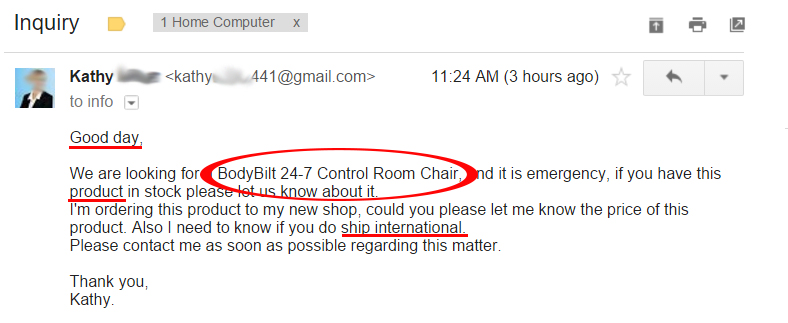
See the screen capture below – This one was particularly tricky and did not follow the typical pattern. However it still has all the signatures of a scam. They lead a unusually polite greeting “Good Day” –  (buyers are hardly ever this polite) 

Then they call out a product we sell “BodyBit 24/7 Chairs” and then continue with a templated email referring back to it as “…if you have this “product” in stock. They are always in a hurry “emergency”.

email purchase scam

Google Review Direct Link

Link to Your Google Reviews Page

Make it easy for people to review you. Provide a direct link to your Local Google+ page in all of your promotional activities and on your website. You might also print out a postcard with the link and instructions, or make a YouTube video showing people how to make a review. The direct link is a very useful and simple process.

Simply add “?hl=en&review=1” at the end of your Google+ page URL. Your Google+ page URL is currently located on your “About” page.

An example of Greg’s Keynamics business is:
www.google.com/+Keynamics4u?hl=en&review=1

Please note that Google is likely to change this direct link extension to add to your Google + Page URL. So check back here often for the latest information – we’ll do our best to keep up with all of the ongoing changes with Google Local Business.

Even if Google changes the direct linking option above, a good backup policy is to also feature a customized link to your Google + page in your advertisements and branding. Hopefully, Google will always allow reviews from your Google + page – See the link below to set up your custom URL.

Click Here for information to set up a Custom URL for your Google + Business Page

Click here for Google’s Community Page for Google My Business

Click here to get started with your Google Local Business Listing

Click here for the Google My Business Help Center

Click Here for Google My Business FAQ’s

Click Here for Google My Business Guidelines

Google Local Business Listings

Google Local Business Listings and Google+ Page Setup

Google’s local business map has evolved over the years, and sometimes the frequent changes are enough to make your head spin off. As we write this book, the dust is still settling on the latest change which moved Google Places to Google+ and renamed it Google My Business. Google My Business connects you directly with customers, whether they’re looking for you on Search, Maps, or Google+.

When you add your business using Google My Business, you’ll create a Google+ Page for your business. Just know that this is one of the first steps in “Playing Google’s Game”—and it’s free.

Click here to get started with your Google Local Business Listing

Click here for the Google My Business Help Center

Click Here for Google My Business FAQ’s

Click Here for Google My Business Guidelines

As frustrating as all of these Google local business changes have been over the years, there is no getting around it; if you want to attract local customers then you must continually tweak and work on your Local Search SEO.

Removing Unnatural Backlinks

Removing Unnatural Backlinks

Maybe your competitor subscribed you to one of those link sharing farms? Maybe you unwittingly hired an unscrupulous website designer or SEO Black Hat marketer? Or maybe you just did not realize it was against the rules.

Google realizes these are all reasons to forgive you for unnatural links. Forgiveness is enlightening even in Google’s eyes. : )

However, you have to take action yourself and it will take some work. We dive into this in Chapter 11, “Google Hates Cheaters”. Just know that Google has some guidelines on removing unnatural backlinks.

For the latest information click here.

Google looks for patterns of unnatural artificial, deceptive, or manipulative links pointing to your site. Remember, buying links or participating in link sharing farms or link schemes in order to manipulate PageRank is a violation of Google’s Guidelines.

Follow the steps below to remove any unnatural backlinks form your website:

Check Your Backlinks

Use Google’s Search Console Tool to See Your Backlinks

Who Has Linked to Your Site?

It’s pretty easy to determine all of the websites that are linking to you. You can choose between one of two ways: search your URL or use your account at Google’s Search Console.

1. Link: Operator
To find a “sampling” of links to your website, you can simply do a Google search using the link: operator.

For example, a Google search for link:www.PlayGooglesGame.com will list a selection of the web pages that have links pointing to our website.

Youtube Channel Video Manager

Editing on Your YouTube Video Manager Page

There are many editing options available after you have published your video. One thing to note is that there is no way to replace an old video with a different version (even if it’s just a slight revision of the same video) and keep the original view count, comments or ratings. Instead, you may want to try using clickable annotations or link to the new version of the video from your old video.

Go to your channel’s Video Manager

You will see a list of your uploaded videos. Find the video you want to edit, then click the little Edit icon in the middle of the video.

On the Info and Settings page, you’ll see three tabs, depending on your account type:

Basic info: Change video title, description, tags, category, privacy. Note: You can use most characters to fill in the information in the video fields (like title or description), except angle brackets.
Monetization: See the options for monetizing your video. Learn more about monetizing your content.
Advanced settings: Change comments permissions, license, caption, video location, recording date, and 3D video options.

Caution: Be careful; changing a title that is already optimized and ranking well for your keywords is a big mistake!

Tip: Download the YouTube Creator Studio app for iOS or android. The app allows you to manage your YouTube Channel from your mobile device.
Enhancement Options and Features Available after Publishing

You can also make some changes to a video that you’ve already uploaded by using YouTube Video Enhancements. The Enhancement option is constantly adding features, so check it often for updates and ways you can tweak your video that has already been published.

Currently, in order to be eligible for YouTube Video Enhancements, your video must not have received more than 1,000 views; other restrictions apply.

Using enhancements, you can make some of the following improvements and edits to your videos. Note that on videos you have already published, you can’t use Cut/Snip at this time to remove middle segments. This feature is only available before you publish the video. You can only use Trim to remove frames at the beginning or the end.

Auto-fix: Performs a one click-fix to enhance the video’s lighting and color. You can also make manual adjustments to Fill Light, Contrast, Saturation, and Color Temperature by using the sliders
Lighting: Fill Light – Contrast – Saturation – Color Temperature
Stabilize: Adjusts the video to correct any shakiness
Slow Motion: Slow the speed at which your video plays (half speed, quarter speed, eighth speed)
Trim: Clip parts (frames) off the beginning and/or end of your video
Filters: This tab shows pre-set color filters that you can apply to your video to give them a stylish and unique look
Face blurring: Protect the anonymity of people in your video. Click on Special Effects to access this feature

YouTube Video Editor

YouTube’s Built in Video Editor

So you don’t have video editing software? No problem; YouTube has a video editor that you can use as you upload the video. This video editor keeps growing in functionality over the years and works very well now.

Access the YouTube Video Editor here  – You’ll need a YouTube account

SEO Juice Alert: Google can more easily recognize edits in their own video editor, versus using a third party. This is especially important when it comes to overlaying text onto your video. Be sure and use your keywords!

This YouTube Video Editor is a great example, because it’s basically a simplified version of more advanced video editors like Adobe Premier Elements.
• Sign in to your YouTube (Gmail) account
• Click the Upload button at the top of the page
• Click Edit on the right of the upload page, under “Video Editor”

With the YouTube Video Editor, you can do all of the things we recommend for editing:

• Combine multiple videos and still images you’ve uploaded to create a new video
• Trim, remove unwanted segments, and slice up your clips to custom lengths
• Add music to your video from a library of approved tracks
• Customize clips with special tools and effects

Using these tools, you can put together clips to create new videos and publish them to YouTube with one click.

All of your previous video uploads are added automatically to the Video Editor and can be transitioned in as a clip on your new video. From your upload list you can drag the clip/image to the bottom of the timeline at the bottom of the editor, where it says, “Drag videos here to begin editing” when you start a new project.

Lengthen or Shorten:

Trim: Cut the length of your clip by moving your cursor over the edges of your video in the timeline. Drag the handles toward the center of the video to shorten. This shortens the length from either the beginning or the end, not the middle. See Cut/Snip below for removing segments from the middle of your clip.

Lengthen: Drag the handles outward from the center of the video to lengthen. Lengthening past the original length of the video will result in the video repeating.

Cut/Snip: Clips can be cut into portions. Move your mouse over the video and click the scissors icon to bring up the snip marker. Move this to where you want to snip the clip, then click on the scissors button to snip the clip.

Customize and Add Effects

Rotate: Rotates your video 90 degrees.

Effects: Apply Video Enhancements to your video to color correct, stabilize, and add filters.

Text: Apply a text overlay on the clip – Use Your Keywords – and Add Your Phone Number and Website Address!

Slow Motion: Modify the speed at which the clip plays. Move your mouse over a clip to bring up any of these options.

Add Music: You can add a new audio track to your video. Click the music note button in the upper left of the editor to bring up YouTube’s library of pre-approved songs. The audio from an added track will overlap or replace your clips’ original audio by default.

Customize the Thumbnail: You can do this either during the upload or after the video is published.